15 Dec 2025
Flagstone landscape stones installed on compacted gravel base creating durable garden pathway

Best Landscape Stones for Garden Pathways: 7 Options That Actually Last

Garden pathways do more than connect one area to another. They guide visitors through your outdoor space, protect your lawn from foot traffic, and define your landscape’s character. But choosing the wrong landscape stones can leave you dealing with shifting surfaces, frequent repairs, and a pathway that looks worn within months.

The right stone choice balances durability, maintenance requirements, and aesthetics. After years of installing pathways throughout Ohio’s varying weather conditions, we’ve seen which materials truly stand the test of time and which ones disappoint homeowners within the first year.

What Makes Landscape Stones Last on Garden Pathways

Before diving into specific stone types, understanding what separates long-lasting pathways from short-lived ones helps you make a smarter choice.

Foot Traffic Resistance: Your pathway needs stones that won’t crack, chip, or shift under regular use. High-traffic areas demand harder materials.

Weather Durability: Ohio experiences freeze-thaw cycles, heavy rain, and hot summers. Stones that absorb too much water can crack when temperatures drop below freezing.

Base Stability: Even premium landscape stones fail without proper installation. The base layer determines whether your pathway stays level or develops dips and high spots within months.

Drainage Performance: Standing water destroys pathways. Materials that allow water to flow through or away from the surface last significantly longer than those that trap moisture.

Flagstone landscape stones installed on compacted gravel base creating durable garden pathway

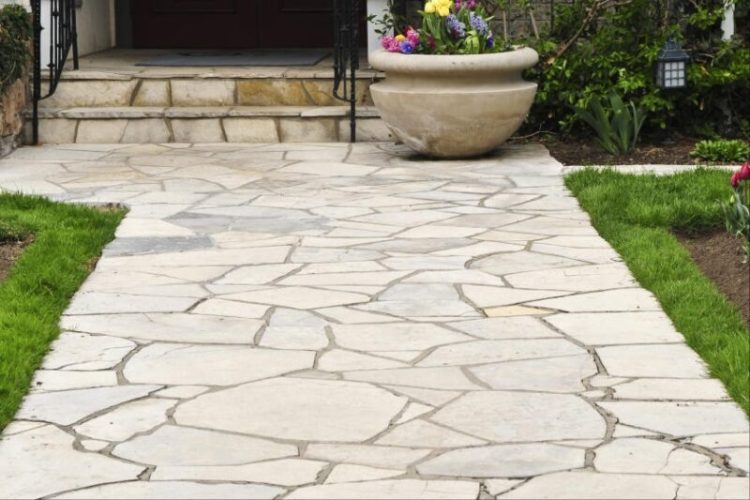
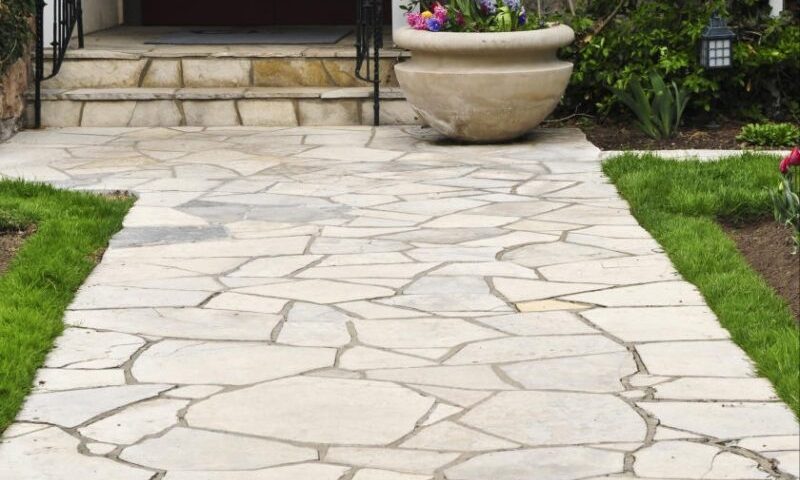
1. Flagstone: The Traditional Pathway Champion

Flagstone remains the most popular choice for garden pathways, and for good reason. These flat, irregular slabs of sedimentary rock create natural-looking paths that complement almost any landscape style.

Durability Rating: When properly installed, flagstone pathways last 50+ years. The material itself resists weathering, though the joints between stones require occasional maintenance.

Best Uses: Winding garden paths, patio connections, and areas where you want an organic, flowing appearance. Flagstone works particularly well for pathways that curve through planted areas.

Maintenance Reality: Flagstone needs periodic resealing every 2-3 years in high-traffic zones to prevent staining. Weeds can grow between stones unless you use polymeric sand in the joints. Budget 1-2 hours per year for basic maintenance on a typical pathway.

Cost Considerations: Expect to pay $15-30 per square foot installed, depending on the stone variety. Pennsylvania bluestone costs more than Oklahoma flagstone, but both deliver excellent longevity.

Installation Notes: Flagstone requires at least 2 inches of compacted base material. Larger slabs (24-48 inches) provide better stability than smaller pieces, though they’re heavier to work with.

2. Decomposed Granite: The Permeable Path Solution

Decomposed granite (DG) offers a completely different approach. Instead of large stones, this material consists of fine granite particles that pack together to create a firm, natural-looking surface.

Durability Rating: Stabilized decomposed granite lasts 7-10 years before needing significant refresh work. The material itself doesn’t fail, but it requires periodic topping and recompaction.

Best Uses: Formal garden pathways, side yard access routes, and areas where you want a smooth, cohesive surface. DG works exceptionally well in drought-prone regions since it doesn’t hold moisture.

Maintenance Reality: DG needs raking every few weeks to maintain an even surface. Plan to add a fresh layer (about 1 inch) every 2-3 years. Edging is essential—without it, the material spreads into adjacent lawn areas. Some homeowners find DG tracks into the house on shoes, especially during the first few months after installation.

Cost Considerations: Material costs run $40-50 per cubic yard. Professional installation typically costs $4-6 per square foot. For DIY projects, the cost drops to roughly half.

Installation Notes: The key to long-lasting DG pathways is using stabilizers. Natural DG alone shifts and becomes muddy. Stabilized DG with binding agents creates a firmer surface similar to packed dirt but more durable.

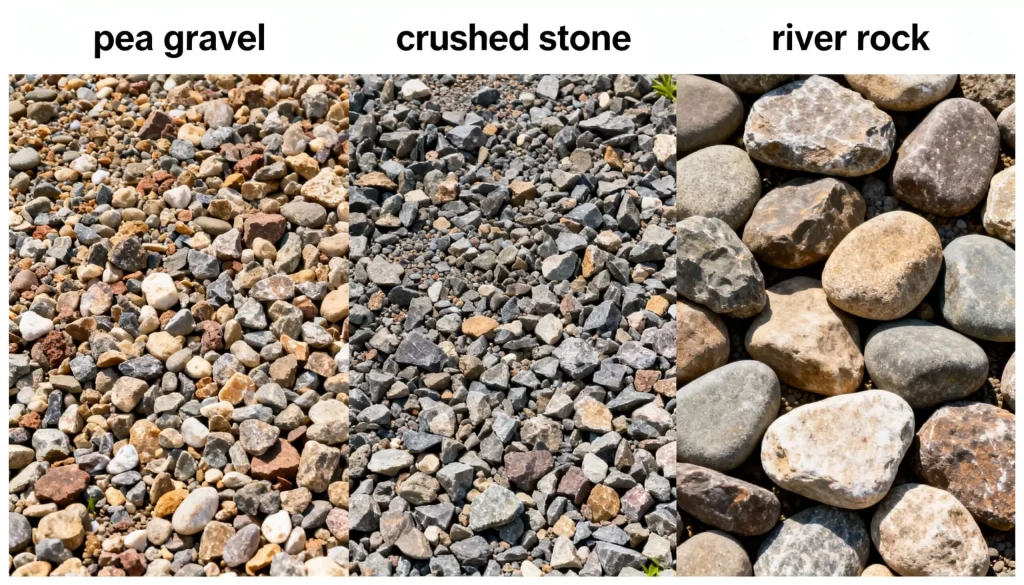
3. River Rock: Natural Beauty With Practical Limitations

River rock’s smooth, rounded appearance brings a water-worn aesthetic to garden pathways. These stones come in sizes ranging from 1 to 6 inches and various earth tones.

Durability Rating: The stones themselves last indefinitely. However, river rock pathways present safety and maintenance challenges that affect their practical longevity.

Best Uses: Decorative accent areas, drainage features, and low-traffic garden sections. River rock works well as a border material for other stone types or filling gaps between larger stepping stones.

Maintenance Reality: Here’s where river rock becomes problematic for main pathways. The rounded stones shift underfoot, creating an uneven walking surface. Smaller rocks (under 1.5 inches) move around more, potentially creating ankle-twisting hazards when they roll onto adjacent stepping stones. Larger river rock (1.5-3 inches) stays put better but feels uncomfortable to walk on. Expect to rake and reset displaced stones monthly in active pathways.

Cost Considerations: River rock costs $50-150 per cubic yard depending on size and color. Installation costs less than flagstone since you’re not fitting individual pieces, typically $3-5 per square foot.

Installation Notes: Use landscape fabric beneath river rock to prevent soil from mixing with the stones. Consider pairing river rock with stepping stones rather than using it as the primary walking surface.

4. Crushed Stone: The Stable, Affordable Option

Crushed stone offers angular edges that lock together better than rounded materials. This category includes crushed granite, crushed limestone, and similar quarried materials.

Durability Rating: Crushed stone pathways last 10-15 years before needing significant replenishment. The angular pieces resist shifting better than rounded stones, creating a more stable walking surface.

Best Uses: Side yards, utility paths, and areas where appearance matters less than function. Crushed stone also works well as a base layer under other materials.

Maintenance Reality: The angular edges mean crushed stone stays in place better than pea gravel or river rock. However, you’ll still need to rake it periodically and add fresh stone every 3-4 years. The rough texture makes it less comfortable for bare feet compared to smoother options.

Cost Considerations: One of the most budget-friendly options at $1-3 per square foot installed. Material costs run $30-50 per cubic yard.

Installation Notes: A 3-4 inch depth provides the best results. The sharp edges can be hard on hands during DIY installation, so work gloves are essential. Crushed stone packs tighter than rounded gravel, creating a firmer pathway over time.

Side by side comparison of crushed stone, river rock, and pea gravel landscape stones for pathways

5. Bluestone: Premium Durability for High-Traffic Areas

Bluestone is a dense sandstone known for its characteristic blue-gray color. This premium material costs more than other options but delivers exceptional performance.

Durability Rating: Properly installed bluestone pathways routinely last 100+ years. Many century-old urban sidewalks still use the original bluestone, proving its remarkable longevity.

Best Uses: Main entrance walkways, high-traffic garden paths, and formal landscape designs. Bluestone’s consistent appearance suits both traditional and modern aesthetics.

Maintenance Reality: Bluestone requires periodic sealing (every 2-4 years) to prevent staining, especially in areas exposed to leaves or organic matter. The material is somewhat porous, so sealing also protects against salt damage in winter. Cleaning with water and mild soap every few weeks keeps it looking fresh.

Cost Considerations: The premium option at $20-40 per square foot installed. Pennsylvania bluestone typically costs more than stone from other regions. Factor in sealing costs ($1-2 per square foot) every few years.

Installation Notes: Bluestone is heavier and more challenging to work with than flagstone. Professional installation is recommended for large areas. The stone’s density makes it more resistant to cracking from freeze-thaw cycles than softer stones.

6. Slate: Texture With Character

Slate offers a refined appearance with natural ridges that provide excellent traction. This metamorphic rock comes in shades of gray, black, green, and even purple.

Durability Rating: Slate pathways last 30-50 years when properly maintained. The material is less porous than flagstone, requiring less frequent sealing.

Best Uses: Contemporary gardens, shaded pathways, and areas where slip resistance matters. Slate’s natural texture prevents slipping even when wet.

Maintenance Reality: Slate needs less maintenance than many alternatives. Sweeping debris regularly and occasional pressure washing keeps slate looking good. Resealing every 3-5 years protects the surface, though slate’s low porosity means it’s less susceptible to staining than bluestone or flagstone.

Cost Considerations: Mid-to-high range at $15-25 per square foot installed. Slate chips (smaller pieces) cost less but create a different aesthetic than larger slabs.

Installation Notes: Slate can be more brittle than sandstone options, so careful handling during installation prevents unnecessary breakage. The material’s smooth, dense surface means it stays cleaner than rougher stones.

7. Pea Gravel: Soft Underfoot, High Maintenance

Pea gravel consists of small, smooth stones (typically 1/4 to 3/8 inch) rounded by water erosion. The material creates a soft, crunchy pathway surface.

Durability Rating: The stones themselves last forever, but pea gravel pathways require constant maintenance to remain functional. Expect major reworking every 5-7 years.

Best Uses: Informal garden paths, play areas, and spaces where the sound of gravel underfoot adds to the ambiance. Pea gravel works well for infrequently used pathways through naturalized garden areas.

Maintenance Reality: This is where pea gravel demands the most attention. The small stones migrate easily, spreading into lawn areas and requiring strong edging. Raking is necessary weekly or biweekly to maintain an even surface. Weeds push through easily without landscape fabric and a thick layer of gravel. The material tracks into the house readily, especially on the bottom of shoes and pet paws.

Cost Considerations: One of the most affordable materials at $1-2 per square foot installed. However, the ongoing maintenance time adds to the true cost. Material costs run $30-60 per cubic yard.

Installation Notes: Pea gravel needs solid edging (metal, plastic, or wood) to contain the stones. Use landscape fabric beneath the gravel to suppress weeds. A 2-3 inch depth works best—too shallow and the stones migrate more, too deep and walking becomes difficult.

Pea gravel landscape stones pathway with metal edging showing proper installation technique

Making Your Selection: What Actually Matters

With seven solid options, how do you choose? These factors drive the decision more than marketing materials or Pinterest inspiration.

Your Actual Maintenance Time: Be honest about how much time you’ll spend maintaining your pathway. If you’re stretched thin, flagstone or slate makes more sense than pea gravel or decomposed granite. The lowest maintenance options (flagstone, bluestone, slate) cost more upfront but save hours of work annually.

Traffic Patterns: The front walkway to your door needs different materials than a meandering garden path you use twice a month. Bluestone and flagstone handle daily traffic effortlessly. Pea gravel and river rock work fine for occasional use but frustrate you quickly in high-traffic locations.

Climate Challenges: Ohio’s freeze-thaw cycles are brutal on certain materials. Porous stones that absorb water can crack when that water freezes. Bluestone, properly sealed flagstone, and slate handle winter better than softer sandstones.

Installation Reality: Some homeowners love DIY projects; others don’t want to touch a wheelbarrow. Pea gravel and crushed stone are reasonably DIY-friendly. Flagstone and bluestone require more skill and possibly equipment rental. Decomposed granite sits somewhere in the middle—easy to spread but tricky to get the compaction right.

Long-Term Cost: The cheapest option rarely costs least over a decade. A $500 pea gravel path that needs reworking every three years eventually costs more than a $1,200 flagstone path that lasts twenty years with minimal maintenance.

Installation Fundamentals That Extend Lifespan

Regardless of which landscape stones you choose, proper installation determines whether your pathway performs well or disappoints you.

Excavation Depth: Different materials require different depths. Gravel paths need about 4 inches of excavation, solid stone requires 5 inches, and paver-style installations need roughly 9 inches. Skimping on depth leads to settling and uneven surfaces within months.

Base Layer Quality: A compacted gravel base creates the foundation for stability. Use crusher run or similar material that compacts tightly. Loose materials under your pathway guarantee future problems.

Edge Restraints: Even solid stone pathways benefit from edging. Edging prevents materials from migrating and maintains clean lines between the pathway and adjacent landscaping.

Drainage Planning: Water is your pathway’s enemy. Grade the pathway slightly for drainage (typically 1-2% slope). Install the base layer to promote water flow away from the surface.

Regional Considerations for Ohio Landscapes

Ohio’s climate throws challenges at garden pathways that desert or southern climates don’t face. Winter salt, freeze-thaw cycles, and spring mud seasons all impact which landscape stones perform best.

Salt Resistance: If you’ll use ice melt products near the pathway, choose materials that resist salt damage. Bluestone is vulnerable to salt; sealed flagstone and slate handle it better. Gravel options (pea gravel, crushed stone) aren’t affected but they’re harder to clear of snow.

Freeze-Thaw Durability: Materials with low water absorption survive freezing temperatures better. Dense stones like bluestone and slate outperform softer, more porous options. Proper sealing protects vulnerable stones.

Mud Season Strategies: Spring thaws turn poorly drained pathways into muddy messes. Gravel-based options (crushed stone, pea gravel) drain well but can get messy. Solid stone on proper bases stays cleaner.

The Verdict: Which Stone Actually Lasts

After installing countless pathways and watching their performance over years, here’s what actually works:

For Primary Walkways: Flagstone or bluestone delivers the best combination of durability, appearance, and reasonable maintenance. Yes, you’ll pay more initially, but you’ll appreciate the decision every time you walk that path for the next several decades.

For Garden Paths: Flagstone or stabilized decomposed granite both work well. Choose flagstone if you want individual stones with plants between them. Choose DG if you prefer a cohesive, smooth surface.

For Budget Projects: Crushed stone provides the best value. It’s not the prettiest option, but it stays put better than pea gravel and costs significantly less than solid stone.

For Occasional-Use Paths: Pea gravel or river rock work fine when foot traffic is minimal. Just understand the maintenance commitment before installation.

Ready to Build a Pathway That Lasts?

Choosing the right landscape stones for your garden pathway means balancing upfront costs against long-term performance and maintenance requirements. The cheapest option rarely proves most economical over time, while the most expensive isn’t always necessary for every application.

The pathways that serve homeowners best for decades share common traits: proper base preparation, appropriate stone selection for the specific use, and realistic expectations about maintenance. Whether you choose classic flagstone, modern decomposed granite, or budget-friendly crushed stone, installation quality matters more than material cost.

Need expert guidance on choosing and installing landscape stones for your pathway? Check out our hardscaping services where our team brings over 25 years of experience creating durable, beautiful pathways throughout the Zanesville area, or call us at (740) 704-7962 to discuss your project. We’ll help you select materials that match your budget, aesthetic preferences, and maintenance expectations—ensuring your pathway looks great and performs reliably for years to come.

20 Oct 2025
A cozy fire pit glows beside a lake at dusk, surrounded by Adirondack chairs on a stone patio. A wooden pavilion with string lights stands nearby, and trees line the lake in the background.

5 Landscape Lighting Mistakes Zanesville Homeowners Make (And How to Avoid Them)

When the sun sets over the Muskingum River and your outdoor space fades into darkness, you’re missing out on hours of potential enjoyment in your yard. Professional landscape lighting can transform your Zanesville property into a stunning evening showcase while improving safety and security. However, many homeowners make critical errors when installing landscape lighting that diminish its effectiveness and visual appeal.

At C.P.’s Landscape & Outdoor Supply, we’ve spent over 30 years helping Zanesville and Cambridge area homeowners create beautiful outdoor spaces. Through countless landscape lighting projects, we’ve seen the same mistakes repeated time and again. The good news? These errors are entirely preventable when you know what to look for.

In this comprehensive guide, we’ll walk you through the five most common landscape lighting mistakes we encounter in Zanesville properties and provide expert solutions to help you avoid them. Whether you’re planning a DIY installation or considering professional outdoor lighting services, understanding these pitfalls will save you time, money, and frustration.

Mistake #1: Over-Lighting Your Property (The Airport Runway Effect)

One of the most frequent landscape lighting errors we see in Zanesville yards is using too many fixtures or lights that are excessively bright. Homeowners often fall into the trap of thinking “more is better,” but this approach typically creates an unwelcoming, harsh environment that looks more like an airport runway than an elegant outdoor space.

Why This Happens

The instinct to over-light comes from a desire to make every corner of your property visible at night. Many homeowners worry about safety and security, leading them to install rows of path lights spaced just inches apart or floodlights that illuminate the entire yard with stadium-like intensity. Box store lighting kits often encourage this problem by including excessive fixtures that homeowners feel obligated to use.

The Problems With Over-Lighting

Excessive outdoor lighting creates several issues:

  • Loss of ambiance and mystery: Landscape lighting should create depth through contrasts between light and shadow. When everything is brightly lit, your yard loses its nighttime character and appears flat and uninviting.
  • Light pollution: Over-lighting disturbs neighbors, obscures starlight, and can disrupt local wildlife patterns, including beneficial insects and birds.
  • Wasted energy and higher bills: More lights mean higher electricity costs every month, especially if you’re not using energy-efficient LED fixtures.
  • Visual fatigue: Overly bright lighting causes glare that makes it harder to see and creates an uncomfortable viewing experience for guests.

The Solution

Think of moonlight as your guide. A full moon produces only about 0.01 foot-candles of light, yet it beautifully illuminates outdoor spaces. Your landscape lighting should aim for a similar soft, subtle effect. Here’s how:

Start minimal and add gradually: Begin with fewer fixtures focused on key features like your front entrance, important walkways, and one or two focal points such as specimen trees or architectural elements. You can always add more lights later if needed.

Use proper fixture placement: For pathways, install lights in a zigzag pattern, alternating from side to side rather than lining them up in straight rows. For curved paths, follow the natural curve of the walkway. This creates visual interest while providing adequate illumination without the runway effect.

Choose appropriate wattage: For LED landscape lighting, use no more than 20 watts equivalent for ambient lighting and 35 watts for accent or feature lighting. Remember that LED lights are significantly brighter than their traditional counterparts, so what seems dim indoors may be perfectly adequate outdoors.

Layer your lighting: Create depth by using different light levels for different purposes. Background lighting should be subtle, pathway lighting functional but gentle, and accent lighting slightly brighter to draw attention to specific features.

professional landscape lighting installation in zanesville

Mistake #2: Using Low-Quality Fixtures That Won’t Survive Ohio Winters

Zanesville’s climate presents unique challenges for landscape lighting. With average winter temperatures dropping to 22°F and frequent freeze-thaw cycles, our Zone 6a conditions can quickly destroy substandard lighting fixtures. Yet many homeowners opt for inexpensive, low-quality products from big box stores, only to find themselves replacing failed fixtures within a year or two.

The Hidden Costs of Cheap Fixtures

Those solar-powered plastic lights might seem like a bargain at first, but they rarely last through a single Zanesville winter. The problems include:

  • Material degradation: Plastic and aluminum fixtures crack, rust, and deteriorate when exposed to our humid summers and harsh winters.
  • Poor water resistance: Inadequate seals allow moisture to penetrate connections, causing corrosion and electrical failures.
  • Weak light output: Cheap fixtures often produce insufficient light and fade quickly over time.
  • Constant replacement: The ongoing cost of replacing failed fixtures far exceeds the initial savings.

Ohio Weather and Your Lighting Investment

Zanesville experiences significant weather extremes that test outdoor fixtures. Our summers bring high humidity and temperatures reaching the mid-80s, while winters deliver snow, ice, and temperature swings that cause repeated freezing and thawing. These conditions demand lighting fixtures built to professional standards.

The Solution

Invest in professional-grade landscape lighting fixtures designed to withstand harsh outdoor conditions. Here’s what to look for:

Choose durable materials: Solid brass or copper fixtures will last a lifetime, even in challenging weather conditions. These materials develop a natural patina over time but maintain their structural integrity and function. Avoid aluminum, plastic, or composite materials for permanent installations.

Verify weatherproofing ratings: Look for fixtures rated IP65 or higher for exposed locations. This rating ensures protection against dust and water jets from any direction. All connections should use waterproof direct burial splices, not standard wire nuts that allow moisture intrusion.

Select LED technology: While LED bulbs cost more initially, they last up to 25 times longer than incandescent bulbs and use significantly less electricity. LED landscape lights also perform better in cold weather and maintain consistent color temperature.

Consider warranty protection: Quality professional-grade lighting systems often come with warranties of 10-15 years or more. This protection gives you peace of mind and confirms the manufacturer’s confidence in their product’s durability.

Plan for snow removal and lawn maintenance: Position lights in garden beds rather than in turf areas where they’re vulnerable to snow blowers, lawn mowers, and weed trimmers. Use in-ground well lights when illumination is needed in lawn areas.

Mistake #3: Creating Direct Glare Instead of Subtle Illumination

Walk through many Zanesville neighborhoods at night, and you’ll notice a common problem: visible light bulbs creating uncomfortable glare rather than beautiful illumination. This mistake occurs when homeowners install fixtures without considering sight lines and proper positioning, resulting in lights that blind rather than beautify.

Understanding the Glare Problem

Direct glare happens when the light source itself is visible to viewers, either from the street, neighboring properties, or within your own outdoor living spaces. Instead of seeing the intended illuminated features—your beautiful stone wall, mature oak tree, or architectural details—people see bright spots that hurt their eyes and obscure everything else.

This issue commonly occurs with:

  • Path lights placed too close to driveways where headlights or passengers see the bulbs directly
  • Uplights positioned in open areas where they’re visible rather than concealed
  • Spotlights aimed at the wrong angle, creating reflective glare off windows
  • Solar lights stuck randomly in lawns with no thought to viewing angles

Why Proper Positioning Matters

The goal of professional landscape lighting is to see the illumination effect, not the light source itself. When fixtures are properly positioned and concealed, they create a magical, almost mysterious quality where light seems to appear naturally, highlighting your property’s best features without revealing the mechanism.

The Solution

Strategic fixture placement transforms harsh glare into elegant illumination:

Hide your fixtures: Position lights behind landscape elements such as shrubs, groundcover, rocks, or architectural features. Well lights can be recessed into turf or hardscaping. The fixture itself should be virtually invisible during the day and the bulb should never be directly visible at night.

Consider viewing angles: Before permanently installing any fixture, test it after dark from multiple vantage points—from the street, from neighboring properties, from your windows, and from outdoor living areas. If you can see the bulb directly from any common viewing angle, reposition the fixture.

Use appropriate beam angles: Different applications require different beam spreads. Narrow beam angles (around 15-25 degrees) work well for tall trees and architectural uplighting. Medium beams (35-45 degrees) suit most general applications. Wide beams (60 degrees or more) are ideal for washing walls or illuminating broad landscape beds.

Install fixtures at proper distances: Position spotlights and uplights at appropriate distances from their targets. Generally, the fixture should be placed about as far from the object as the object is tall, though this varies based on the desired effect and fixture specifications.

Add shields and directional controls: Many quality fixtures include adjustable shrouds or shields that prevent light spill in unwanted directions. Use these controls to direct light precisely where it’s needed while blocking glare.

Match fixture type to application: Spotlights accent individual objects, floodlights illuminate broad areas, well lights hide in hardscapes and lawns, path lights provide safe walkway illumination, and downlights mounted from above create pools of light below. Using the wrong fixture type for a specific application almost always creates problems.

Mistake #4: Ignoring Balance and Design Cohesion

Many homeowners approach landscape lighting as a series of individual decisions rather than as a comprehensive design. They light the front walkway one year, add a spotlight on a tree the next, and gradually accumulate fixtures without an overall vision. The result is a disjointed, unbalanced lighting scheme that fails to showcase the property effectively.

The Importance of Balanced Lighting Design

Professional landscape lighting creates visual harmony across your entire property. This means considering how different illuminated areas relate to each other and ensuring that lighting intensity, color temperature, and fixture style work together cohesively.

Common Balance Problems

We frequently see these issues in Zanesville landscapes:

  • Uneven illumination: The left side of a front yard is brightly lit while the right side remains dark, creating an uncomfortable asymmetry.
  • Inconsistent techniques: Trees are uplighted on one side of the property but not the other, or architectural columns are lit differently from one to the next.
  • Mismatched color temperatures: Some fixtures produce warm white light while others cast a cool blue tone, creating a jarring visual conflict.
  • Spotty coverage: Important areas remain unlit while less significant features are emphasized.

The Solution

Think of your landscape lighting as a complete design rather than individual fixtures:

Create symmetry where appropriate: If you light architectural features like columns, pergolas, or both sides of an entrance, use identical techniques and fixtures. Both sides of your front yard should have similar levels and styles of illumination when viewed from the street.

Develop lighting zones: Divide your property into functional areas—entry zone, pathway zone, outdoor living zone, perimeter zone—and design lighting appropriate to each zone’s purpose. Front yard lighting typically emphasizes curb appeal and safe entry, while backyard lighting focuses on extending living space and highlighting water features or specimen plants.

Maintain consistent color temperature: All your landscape lighting should use the same color temperature, typically between 2700K and 3000K for architectural and general lighting. This creates a warm, inviting glow that complements most home exteriors. Tree lighting might go slightly warmer (up to 3500K) depending on the species and your preferences, but maintain consistency across similar applications.

Consider seasonal changes: Zanesville’s dramatic seasonal transformations affect how landscape lighting appears. Deciduous trees that look stunning uplighted in summer may need different fixtures or lamp adjustments when bare in winter. Perennial beds that glow beautifully in July disappear by November. Plan your lighting design to work year-round.

Integrate with hardscaping and landscape features: Your lighting should complement existing landscape elements. If you have beautiful stone retaining walls, hardscaped patios, or water features, incorporate these into your lighting design. At C.P.’s Landscape & Outdoor Supply, we often design hardscaping and lighting together to ensure perfect integration.

Plan for growth: Young trees and immature plantings require different lighting than established landscapes. Use adjustable fixtures that can be repositioned as plants grow, or plan to update fixtures as your landscape matures.

Balanced landscape lighting design in Zanesville showing cohesive outdoor illumination across hardscaping and plantings - landscaping lighting mistakes
Balanced landscape lighting design in Zanesville showing cohesive outdoor illumination across hardscaping and plantings

Mistake #5: Neglecting Proper Electrical Installation and Technical Requirements

Perhaps the most serious mistake homeowners make is improper electrical installation. This isn’t just about aesthetics—faulty wiring and incorrect transformer sizing can create safety hazards, cause system failures, and lead to expensive repairs. Unfortunately, many DIY installations and even some “professional” jobs cut corners on the technical requirements that ensure reliable, safe operation.

Critical Technical Mistakes to Avoid

Undersized transformers: Every landscape lighting system requires a transformer to convert standard 120-volt household current to the 12-volt low-voltage current used by most landscape lights. Each transformer has a maximum capacity measured in watts. Overloading a transformer by connecting too many fixtures causes lights to dim, creates potential fire hazards, and leads to premature system failure. For larger properties or complex designs, multiple transformers may be necessary to handle the load.

Voltage drop problems: Low-voltage current loses power over distance, especially when many lights share the same wire run. This phenomenon, called voltage drop, causes fixtures at the end of a circuit to appear noticeably dimmer than those near the transformer. Runs longer than 100 feet or circuits with more than 10 lights require careful planning, larger gauge wire, and possibly multiple transformer locations. Using a voltmeter during installation helps identify and correct voltage drop issues before they become problems.

Poor wire connections: Underground wiring faces constant exposure to moisture, soil pressure, and temperature extremes. Using inadequate connectors guarantees eventual failure. Standard wire nuts buried underground will corrode and fail. “Pierce point” connectors that puncture wire insulation create entry points for moisture. Only waterproof direct burial splices filled with protective gel should be used for landscape lighting connections. Every splice point should be properly sealed and protected.

Ignoring safety codes and permits: While low-voltage landscape lighting doesn’t require the same licensing as standard electrical work in most areas, it still must meet local codes and safety standards. Buried wires should be placed at appropriate depths (typically 6 inches minimum) and protected by conduit when necessary. Transformers must be properly grounded and mounted according to manufacturer specifications.

The Solution for Technical Excellence

For reliable, long-lasting landscape lighting, technical excellence matters as much as design:

Professional assessment: Before beginning installation, have a qualified professional assess your property’s electrical capacity, plan appropriate transformer locations, and design wire runs that minimize voltage drop while providing adequate power to all fixtures.

Use quality electrical components: Invest in commercial-grade transformers with appropriate capacity for your system plus 20-25% extra capacity for future expansion. Purchase only properly rated direct burial cable—14-gauge or heavier for most applications—and use waterproof gel-filled wire connectors at every splice.

Install with precision: Measure voltage at multiple points in the system during installation to verify proper power delivery to all fixtures. Bury wires at appropriate depths and protect them with conduit in areas where digging might occur in the future. Keep detailed records of wire paths and connection locations for future reference.

Consider smart controls: Modern landscape lighting systems can include timers, photocells, and even smartphone-controlled systems that allow you to adjust timing, dimming, and individual fixture control. These features maximize energy efficiency and give you complete control over your outdoor lighting environment.

Plan for maintenance: Even the best systems require occasional attention. Fixtures may need repositioning as plants grow, bulbs eventually need replacement (though LED bulbs last many years), and connections should be periodically inspected. Professional systems typically include maintenance plans that keep everything operating optimally.

The Zanesville Advantage: Professional Landscape Lighting That Performs

Zanesville’s unique climate and landscape characteristics demand lighting solutions that understand our local environment. From our clay-heavy soils and frequent rainfall to our cold winters and humid summers, every aspect of your landscape lighting installation must account for these regional factors.

At C.P.’s Landscape & Outdoor Supply, we’ve been creating beautiful, functional outdoor spaces for Zanesville and Cambridge area homeowners for over three decades. Our experience with local conditions means we understand exactly what works—and what doesn’t—in our climate zone.

What Professional Installation Provides

When you work with experienced landscape lighting professionals, you receive:

  • Customized design that highlights your property’s best features while addressing your specific needs for safety, security, and aesthetic appeal
  • Quality materials built to withstand Ohio weather extremes, backed by substantial warranties
  • Technical expertise ensuring proper electrical installation, adequate transformer capacity, and reliable long-term performance
  • Integrated approach that coordinates lighting with your existing or planned hardscaping, plantings, and water features
  • Ongoing support including maintenance, adjustments as plants grow, and system expansion when desired

Beyond Lighting: Complete Outdoor Living Solutions

Landscape lighting is just one element of creating an exceptional outdoor environment. At C.P.’s Landscape & Outdoor Supply, we offer comprehensive services including:

  • Premium landscape supplies: mulch, river rock, sand, topsoil, and decorative stone
  • Professional lawn care and maintenance services
  • Custom hardscaping: patios, walkways, retaining walls
  • Drainage solutions that protect your landscape investment
  • Water features that become stunning focal points at night when properly lit
  • Plantings and flower beds designed for year-round beauty

When these elements work together cohesively, your outdoor space becomes a true extension of your home—a place where you want to spend time both day and night.

Making the Right Choice for Your Property

Avoiding these five common landscape lighting mistakes ensures your investment delivers lasting value and beauty. Whether you’re planning a complete outdoor transformation or simply want to enhance your property’s evening appearance, understanding these principles guides you toward success.

Remember that landscape lighting is both an art and a science. The artistic elements—choosing what to illuminate, creating visual balance, and establishing the right ambiance—combine with technical requirements like proper electrical installation and weather-resistant components to deliver systems that perform flawlessly for years.

Transform Your Zanesville Landscape With Professional Lighting

Ready to see your property in a whole new light? Don’t let common mistakes diminish your investment or create frustrating problems down the road.

Contact CP’s Landscaping & Outdoor Supply today to schedule your free landscape lighting consultation. Or call us directly for immediate assistance and advice. Our experienced team will assess your property, discuss your goals, and design a custom lighting solution that enhances your outdoor space while avoiding the pitfalls that plague amateur installations.

30 Aug 2025

Landscaping Challenges in Zanesville: Expert Solutions and Tips

Landscaping challenges are a common concern for homeowners in Zanesville, Ohio. The area’s unique climate, soil conditions, and topography often present hurdles for anyone trying to create a healthy, attractive outdoor space. From dealing with clay-heavy soil to managing slopes and erosion, understanding these landscaping challenges is the first step toward building a thriving garden or lawn. In this guide, we’ll explore the most common landscaping challenges in Zanesville and offer practical solutions and tips to help you overcome them effectively.

Understanding Zanesville’s Climate and Its Impact on Landscaping Challenges

One of the primary landscaping challenges in Zanesville is the region’s variable climate. Summers are often hot and humid, while winters can be cold with occasional snowfall. These seasonal extremes can stress lawns, flowers, shrubs, and trees. Plants that thrive during the warm, humid months may struggle during the winter, while frost-sensitive species may fail to survive.

Practical Strategies for Zanesville Landscapes:

  • Select plants suited to Zanesville’s climate. Native species are ideal because they are naturally adapted to the local weather patterns and soil conditions.
  • Consider planting a mix of perennials and annuals to maintain color and vitality throughout the year.
  • Use mulch around plants to protect roots from temperature fluctuations and retain soil moisture during dry spells.

Soil Quality: One of the Most Common Landscaping Challenges

Soil type is a critical factor in landscaping success, and Zanesville’s soil can vary dramatically from one property to another. Some areas have heavy clay soil, which retains water and can lead to poor drainage. Other areas may have sandy soil that drains too quickly, leaving plants undernourished.

Effective Soil Management Strategies:

  • Conduct a soil test to determine your soil’s pH, nutrient levels, and composition.
  • Amend clay soil with organic matter like compost or peat moss to improve drainage.
  • Improve sandy soil with organic matter or garden soil to increase water retention.
  • Apply slow-release fertilizers appropriate for your plants to promote healthy growth without overfeeding.

Managing Slopes and Erosion: A Key Landscaping Challenge in Hilly Areas

Many Zanesville properties are not perfectly flat, and hilly terrain can lead to significant landscaping challenges. Erosion is common on slopes, especially during heavy rain, which can wash away topsoil and nutrients. Left unmanaged, erosion can damage plants, reduce soil fertility, and even threaten property structures.

Preventing Erosion and Managing Slopes:

  • Plant ground covers, ornamental grasses, or shrubs that have strong root systems to stabilize slopes.
  • Consider building retaining walls or terraces to control soil movement and create usable garden areas.
  • Use mulch or landscape fabric to protect exposed soil and reduce erosion risks.
  • Install French drains or other drainage solutions to redirect excess water away from vulnerable areas.

Choosing the Right Plants to Overcome Landscaping Challenges

Plant selection is essential for tackling landscaping challenges in Zanesville. Using species that thrive in your soil type, tolerate your climate, and require minimal maintenance will reduce the time and effort needed to maintain your landscape.

Plant Selection Strategies:

  • Focus on native plants such as Ohio coneflower, black-eyed susan, and prairie grasses, which are naturally resilient.
  • Group plants with similar water and sunlight requirements to simplify care.
  • Avoid invasive species that can overtake your garden and create additional maintenance challenges.
  • Mix perennials and annuals for both longevity and seasonal color.

Irrigation and Water Management: Addressing One of the Toughest Landscaping Challenges

Proper watering is another major challenge. Both under- and over-watering can stress plants and promote disease. Zanesville’s hot summers require efficient irrigation to keep lawns and gardens healthy, while cold winters demand measures to prevent damage from freezing water.

Smart Watering Techniques:

  • Install drip irrigation systems to deliver water directly to the plant roots, reducing waste and promoting deep root growth.
  • Use soaker hoses for garden beds to evenly distribute water.
  • Mulch around plants to conserve moisture and maintain consistent soil temperature.
  • Adjust watering schedules seasonally to match rainfall and temperature changes.

Lawn Care: A Frequent Landscaping Challenge for Zanesville Homeowners

Lawns often face multiple landscaping challenges, including soil quality, pests, and disease. Maintaining a healthy, green lawn in Zanesville requires attention to seasonal conditions and proper lawn care techniques.

Maintaining a Healthy Lawn:

  • Aerate lawns in spring or fall to improve root growth and nutrient absorption.
  • Overseed bare or patchy areas to maintain uniform coverage.
  • Fertilize appropriately, considering soil test results to prevent over- or under-fertilization.
  • Control weeds and pests early to prevent infestations from spreading.

Hardscaping Considerations: Tackling Landscaping Challenges with Structures

Hardscaping elements like patios, walkways, and retaining walls can add both beauty and functionality to your landscape. However, improper planning or installation can create additional challenges, including water pooling, erosion, or maintenance issues.

Optimizing Hardscape Features:

  • Plan hardscape features with proper grading and drainage in mind.
  • Choose durable materials suitable for Zanesville’s climate.
  • Ensure retaining walls and raised beds are reinforced to prevent shifting or collapse.
  • Incorporate hardscaping that complements your garden layout and does not interfere with plant growth.

Seasonal Landscaping Challenges and How to Overcome Them

Each season brings its own set of landscaping challenges. Zanesville’s weather extremes can cause plant stress, soil issues, and lawn damage.

Seasonal Care Strategies:

  • Prepare garden beds by clearing debris and adding compost.
  • Prune dead branches and remove winter mulch to allow new growth.
  • Apply pre-emergent weed control before seeds germinate.

Summer Tips:

  • Water deeply and less frequently to encourage strong root growth.
  • Monitor for pests and fungal diseases, especially during humid months.
  • Apply mulch to reduce soil temperature and retain moisture.

Fall Tips:

  • Plant bulbs and perennials for spring blooms.
  • Fertilize lawns to prepare for winter dormancy.
  • Remove fallen leaves to prevent mold or fungal growth.

Winter Tips:

  • Protect vulnerable plants with burlap or frost blankets.
  • Reduce watering as needed to prevent root rot.
  • Plan next year’s garden layout to address persistent landscaping challenges.

Local Expertise: How Professionals Can Help with Landscaping Challenges

While DIY solutions are valuable, consulting local landscaping professionals can be one of the most effective ways to overcome landscaping challenges in Zanesville. Experts can provide tailored advice based on property conditions, soil type, and climate considerations. They can also install irrigation systems, retaining walls, and other features that are difficult to execute without experience.

Benefits of Professional Assistance:

  • Personalized plant and soil recommendations for your property
  • Efficient installation of irrigation and drainage systems
  • Advice on seasonal care and pest management
  • Long-term planning for sustainable, low-maintenance landscapes

Conclusion

Landscaping challenges in Zanesville are real, but they are not insurmountable. By understanding your property’s unique climate, soil, and topography, choosing the right plants, managing water effectively, and seeking professional guidance when needed, you can create a thriving outdoor space that enhances your home’s beauty and value.

Ready to tackle your landscaping challenges? Contact CP’s Landscaping & Outdoor Supply today for expert guidance and solutions tailored to your property. Or call us directly at (740) 704-7962 for immediate assistance and advice.

03 Jan 2025
A large, neatly mowed lawn with diagonal stripes leading towards houses and trees in the background. A car is parked in front of one house on a clear day.

Routine Lawn Mowing

A healthy, vibrant lawn mowing job is the foundation of a beautiful outdoor space. While factors like soil quality and fertilization play a role, proper mowing practices are crucial for maintaining a lush and thriving lawn in Zanesville.

Why Routine Mowing Matters:

  • Encourages Thick Growth: Regular mowing encourages dense growth by stimulating lateral growth rather than vertical growth. This results in a stronger root system and a more resilient lawn.  
  • Prevents Weed Growth: Frequent mowing keeps weeds under control by preventing them from flowering and spreading seeds.
  • Reduces Stress: Overgrown grass can shade out the lower portion of the plant, leading to stress and weakening.
  • Improves Appearance: A well-mowed lawn simply looks better! It enhances the curb appeal of your property and creates a more inviting outdoor space.

Mowing Tips for a Healthy Lawn in Zanesville:

  • The One-Third Rule: Never remove more than one-third of the grass blade at a time. This prevents stress and ensures the health of your lawn.
  • Sharp Blades: Dull blades tear the grass, which can lead to disease and stress. Sharpen your mower blades regularly for the best results.  
  • Proper Mowing Height: The ideal mowing height varies depending on the type of grass. Consult with a local expert or do some research on the best mowing height for your specific grass type.
  • Vary Your Mowing Pattern: Changing your mowing pattern from week to week helps to prevent soil compaction and encourages even growth.  
  • Water Deeply and Infrequently: Water your lawn deeply and infrequently to encourage deep root growth. This helps your lawn withstand periods of drought.

When to Mow:

  • Morning or Evening: Avoid mowing during the hottest part of the day to prevent stress on the grass.
  • After Rain: Avoid mowing when the grass is wet to prevent clumping and damage to your mower.  

Professional Lawn Mowing Services in Zanesville:

At CP’s Landscaping & Outdoor Supply, we offer professional lawn mowing services to keep your Zanesville property looking its best. Our experienced team utilizes top-of-the-line equipment and follows best practices to ensure a healthy and vibrant lawn.  

Contact us today to learn more about our lawn mowing services and schedule a free consultation.

14 Aug 2024
A stone walkway curves through a landscaped backyard with gravel, a large rock, an outdoor fireplace, and a lawn bordered by a white fence and trees in the background.

Hardscaping Ideas to Transform Your Property

Hardscaping involves incorporating non-plant elements into your landscape design. This can include a wide range of features, from patios and walkways to retaining walls and fire pits. When done right, hardscaping can dramatically enhance the functionality, aesthetics, and value of your Zanesville property.

Popular Hardscaping Ideas:

  • Patios and Walkways: Create inviting outdoor living spaces with beautiful patios and walkways constructed from materials like natural stone, brick, or concrete.
  • Retaining Walls: These versatile structures can help prevent soil erosion, create defined spaces, and add visual interest to your landscape.  
  • Fire Pits and Fireplaces: Gather around a cozy fire pit or fireplace for warm evenings with family and friends.
  • Water Features: Add a touch of tranquility with a soothing water feature, such as a pond, waterfall, or fountain.
  • Outdoor Kitchens: Equip your outdoor living space with a fully functional outdoor kitchen, complete with grills, countertops, and seating.
  • Pergolas and Arbors: Create shaded areas for relaxation and dining with elegant pergolas and arbors.

Benefits of Hardscaping:

  • Increased Functionality: Hardscaping features can add valuable living space to your property, creating defined areas for dining, entertaining, and relaxation.  
  • Enhanced Aesthetics: Well-designed hardscaping can significantly improve the visual appeal of your landscape, adding texture, color, and visual interest.  
  • Increased Property Value: Hardscaping features can enhance your property’s curb appeal and increase its overall value.  
  • Low Maintenance: Many hardscaping materials are durable and low-maintenance, requiring minimal upkeep.  
  • Improved Drainage: Hardscaping elements can help improve drainage and prevent water damage to your property.  

Choosing the Right Hardscaping Materials:

  • Natural Stone: Offers a timeless and elegant look with a variety of colors and textures.
  • Brick: Provides a classic and versatile option for patios, walkways, and retaining walls.  
  • Concrete: Durable and affordable, concrete can be used to create a variety of hardscaping features.  
  • Pavers: Interlocking pavers offer a wide range of colors, styles, and patterns.  

Professional Hardscaping Installation in Zanesville:

At CP’s Landscaping & Outdoor Supply, we specialize in designing and installing high-quality hardscaping features that are both beautiful and functional. Our experienced team will work closely with you to understand your vision and create a custom design that complements your property and lifestyle.  

Contact us today for a free consultation and let us transform your Zanesville outdoor space with stunning hardscaping.

06 Jul 2024
A retaining wall with a wet concrete surface in front, small evergreen trees, rocks, and mulch on a sloped yard, with a wooden fence and bare trees in the background.

Retaining Wall Solutions for Curb Appeal

Retaining walls are more than just aesthetic additions to your Zanesville property. They serve a crucial function in preventing soil erosion, stabilizing slopes, and creating defined outdoor spaces. Whether you’re dealing with a sloping backyard, creating a terraced garden, or simply adding a touch of elegance, retaining walls offer a versatile and durable solution.

The crews at CP’s Landscape & Outdoor supply have years of experience in planning and creating retaining walls that look good and do their job.

Benefits of Retaining Walls:

  • Erosion Control: Retaining walls effectively prevent soil erosion caused by heavy rainfall, runoff, and gravity, protecting your property from damage.  
  • Enhanced Curb Appeal: They add a touch of sophistication and structure to your landscape, creating visual interest and defining different levels within your yard.  
  • Increased Usable Space: Retaining walls can create usable space on sloping terrain, allowing you to transform unusable areas into functional patios, gardens, or seating areas.  
  • Improved Drainage: They can help redirect water flow, preventing waterlogging and improving drainage in your landscape.  
  • Increased Property Value: A well-designed and constructed retaining wall can significantly enhance the curb appeal and value of your Zanesville property.  

Types of Retaining Walls:

  • Gravity Walls: These walls rely on their own weight for stability and are typically constructed from materials like natural stone, concrete blocks, or interlocking concrete pavers.  
  • Cantilever Walls: These walls use reinforced concrete to create a cantilevered structure, making them suitable for taller walls and challenging slopes.  
  • Sheet Pile Walls: These walls are constructed from interlocking sheets of metal or timber, often used for deeper excavations and larger projects.  
  • Gabion Walls: These walls are made from wire mesh cages filled with rocks, offering a natural and rustic appearance.  

Choosing the Right Retaining Wall for Your Zanesville Property:

The best type of retaining wall for your property will depend on several factors, including:

  • Soil Conditions: The type and stability of the soil will influence the design and construction of the wall.  
  • Slope Angle: The steeper the slope, the more robust the wall needs to be.
  • Aesthetic Preferences: Consider the overall style of your home and landscape when choosing materials and design.
  • Budget: Retaining wall costs can vary significantly depending on the materials used, size, and complexity of the project.  

Professional Retaining Wall Installation in Zanesville:

At CP’s Landscaping & Outdoor Supply, we specialize in designing and installing high-quality retaining walls that are both functional and aesthetically pleasing. Our experienced team will work closely with you to understand your specific needs and create a custom solution that meets your budget and exceeds your expectations.  

Contact us today for a free consultation and let us help you transform your Zanesville property with a beautiful and durable retaining wall.